Print selected cells
- Select the cells that you want to print.
- On the File menu, click Print.
- Under Print What, click Selection.
- Click Print.
- How do I print selected cells in Excel?
- How do I print selection only on Mac?
- How do I print only certain columns in Excel?
- How do you print selection on Mac 2018?
- How do I make row 1 print on every page?
- How do you display formulas in a worksheet?
- How do you highlight and print on a Mac?
- How do I print selection only?
- How do I print certain columns and rows in Excel?
- How do I get my Excel spreadsheet to print on one page?
- How do I adjust the print area in Excel?
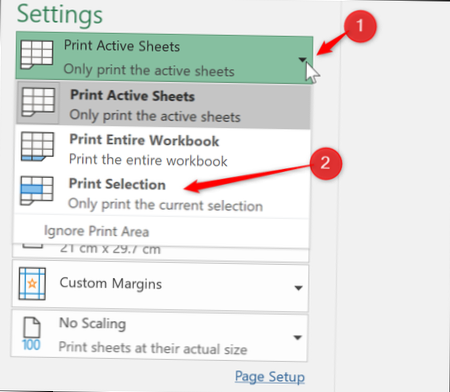
How do I print selected cells in Excel?
Select and highlight the range of cells you want to print. Next, click File > Print or press Ctrl+P to view the print settings. Click the list arrow for the print area settings and then select the “Print Selection” option. The preview will now show only the selected area.
How do I print selection only on Mac?
Print selection using MAC
Simply highlight the portion you want to print , hold down the shift key, go to file and click print selection. That's it!
How do I print only certain columns in Excel?
Just select another area and when you click on Print Area select Add to Print Area. Then when you go into Print Preview you can page through the different areas you've selected. The Print Areas will stay set until you clear them out. Just click on Print Area then select Clear Print Area.
How do you print selection on Mac 2018?
Select the printer you want to use in the list of available printers. Tap the Open Print Queue button to the right of that list. The Print Queue for that printer will open. Now drag & drop the items you wish to print into the Print Queue — your Mac will then open each item up, print them, and close the application.
How do I make row 1 print on every page?
Note:
- Click the [Page Layout] tab > In the "Page Setup" group, click [Print Titles].
- Under the [Sheet] tab, in the "Rows to repeat at top" field, click the spreadsheet icon.
- Click and select the row you wish to appear at the top of every page.
- Press the [Enter] key, then click [OK].
How do you display formulas in a worksheet?
In your Excel worksheet, go to the Formulas tab > Formula Auditing group and click the Show Formulas button. Microsoft Excel displays formulas in cells instead of their results right away. To get the calculated values back, click the Show Formulas button again to toggle it off.
How do you highlight and print on a Mac?
Answer: A:
- select the text.
- copy the text to the clipboard (either via the Edit menu, or command-C)
- open a text app, for example, TextEdit.
- paste the text into the app (either via the Edit menu, or command-V)
- print.
How do I print selection only?
Just select the desired text on the current page and press CTRL+P. This will bring up the Print dialog, where you can simply select the "Selection" option there. This will print out only the selected text.
How do I print certain columns and rows in Excel?
On the Ribbon, click the Page Layout tab. In the Sheet Options group, under Headings, select the Print check box. , and then under Print, select the Row and column headings check box . To print the worksheet, press CTRL+P to open the Print dialog box, and then click OK.
How do I get my Excel spreadsheet to print on one page?
Shrink a worksheet to fit on one page
- Click Page Layout. ...
- Select the Page tab in the Page Setup dialog box.
- Select Fit to under Scaling.
- To fit your document to print on one page, choose 1 page(s) wide by 1 tall in the Fit to boxes. ...
- Press OK at the bottom of the Page Setup dialog box.
How do I adjust the print area in Excel?
How to expand print area in Excel
- Select the cells that you'd like to add.
- On the Page Layout tab, in the Page Setup group, click Print Area > Add to Print Area.