Click File > Options. Click Trust Center > Trust Center Settings > Protected View. Make selections that you want.
- How do I enable protected view for editing?
- What is Protected View in Word 2016?
- How do I remove a protected Word document?
- Why does my Microsoft Word say read-only?
- How do I enable Protected View in Excel 2010?
- How do I disable Protected View?
- How do I enable contents in Word 2016?
- How do I turn off enable editing in Word 2016?
- How do I unprotect a protected Word document?
- How do you unlock a Word document that is locked for editing?
- How can I copy a protected Word document?
How do I enable protected view for editing?
Enable editing in your document
- Go to File > Info.
- Select Protect document.
- Select Enable Editing.
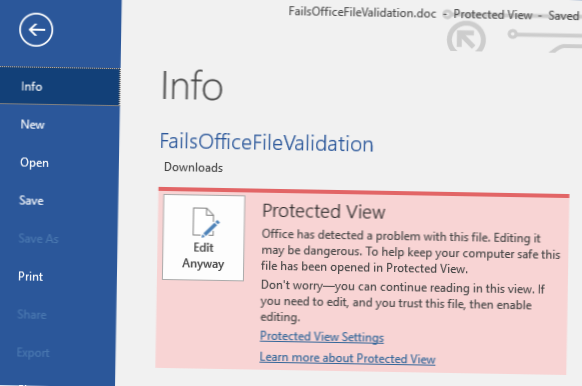
What is Protected View in Word 2016?
Tips: "Protected View" is actually one very useful feature to secure computer system from potentially dangerous programs/files. Once a Word/Excel/PowerPoint document is received from the Internet or other places, Office program will detect it.
How do I remove a protected Word document?
Removing a password from a document is a simple process, but you have to know the original password.
- Open the document and enter its password.
- Go to File > Info > Protect Document > Encrypt with Password.
- Clear the password in the Password box, and then click OK.
Why does my Microsoft Word say read-only?
Are the file properties set to read-only? You can check the file properties by right-clicking on the file and choosing Properties. If the Read-only attribute is checked, you can uncheck it and click OK.
How do I enable Protected View in Excel 2010?
Choose File, and then Options. Within the Options window, choose Trust Center, and then click the Trust Center Settings button. Within the Trust Center Settings, choose Protected View, and make any adjustments necessary, and then click OK twice.
How do I disable Protected View?
Disabling Protected View for Office files
- Open an Office application (Word, Excel, or PowerPoint). ...
- Click File, and then click Options.
- Click Trust Center on the left, and then click the button Trust Center Settings.
- Click Protected View on the left, and then deselect all the check boxes on the right.
- Click OK in each open window to close it.
How do I enable contents in Word 2016?
Click the File tab. In the Security Warning area, click Enable Content. Select Advanced Options. In the Microsoft Office Security Options dialog box, click Enable content for this session for each macro.
How do I turn off enable editing in Word 2016?
Here's how:
- Step 1: Start Word, click File and then choose Options.
- Step 2: Click Trust Center and then Trust Center Options.
- Step 3: Click Protected View, then disable (uncheck) all three of the options listed there.
- Step 4: Click OK and you're done!
How do I unprotect a protected Word document?
Follow these simple steps to do it: Step 1: Open the Microsoft Word document that you want to unprotect and then click on "File" and select "Protect Document" under the section marked "Info". Step 2: In the drop-down menu, select "Encrypt with Password" and then remove the password from the password field. Click "OK".
How do you unlock a Word document that is locked for editing?
To do so, follow these steps:
- Save all your work, and then quit all programs.
- Press CTRL+ALT+DELETE to open the Windows Security dialog box.
- Click Task Manager, and then click the Processes tab.
- Click Winword.exe, and then click End Process.
- In the Task Manager Warning dialog box, click Yes.
How can I copy a protected Word document?
How to Copy From a Locked Word Document
- If you already know how to copy and paste text, you can do so just as you normally would. ...
- Go to "Edit" and choose "Copy." This will place the text on a virtual "clipboard." Word won't tell you that the text has been successfully copied.
- Go to "File" and select "New." A blank document will appear.