Windows 10: Disable Syncing Themes Go to Settings > Accounts > Sync your settings. From the right-hand pane, select Individual sync settings. Toggle the Theme setting to off. That's all there is to it!
- How do I delete a synced theme?
- How do I remove themes from Windows 10?
- How do I delete sync data Windows 10?
- How do I turn off background sync in Windows 10?
- How do I change the synced theme in Windows 10?
- How do I stop my laptop from syncing?
- How do I reset my default Windows 10 theme?
- Where are Windows 10 themes stored?
- How do I edit themes in Windows 10?
- Should I turn off Sync?
- How do I remove sync from my computer?
- How do I unlink my Microsoft account from my laptop?
How do I delete a synced theme?
Step 1: Open Settings app. Click Personalization icon, and then click Themes to see all installed themes as well as default themes. Step 2: To delete a theme, right-click on the theme tile, and then click Delete option. Please note that you cannot delete the currently active theme.
How do I remove themes from Windows 10?
How to remove a theme in Windows 10?
- Open Windows Settings (Windows Key + I).
- Then click on Apps.
- Scroll down and locate the theme.
- Click on the theme and then click Uninstall.
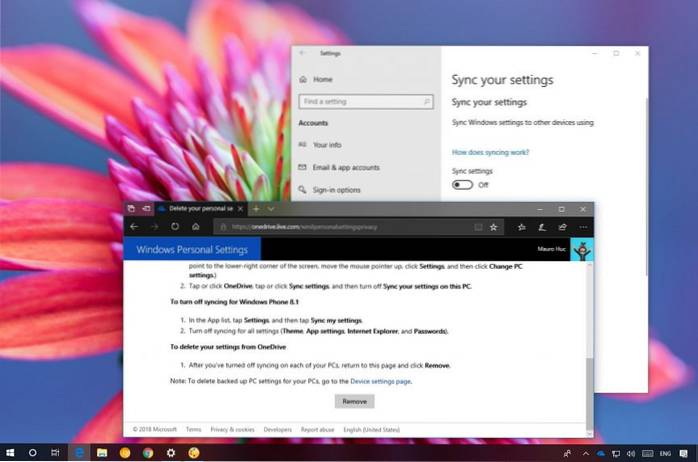
How do I delete sync data Windows 10?
Here's How:
- Turn off sync settings on all Windows 10 devices that you've signed in to with your Microsoft account. ...
- Go to the Delete your personal settings from the cloud webpage at Microsoft, and click/tap on the Remove button. ( ...
- Click/tap on Yes to confirm. ( ...
- Your sync settings have now been deleted. (
How do I turn off background sync in Windows 10?
- Open the Windows Start Menu.
- Click your profile icon. A menu pops out, select "Change account settings"
- Click "Sync your settings"
- Click/Toggle "Theme" to Off.
How do I change the synced theme in Windows 10?
If you're signed in with your Microsoft account, and you have the sync options enable, the theme you set on your computer will sync across devices.
...
Changing themes
- Open Settings.
- Click on Personalization.
- Click on Themes.
- Under "Apply a theme," click the one you want to apply to your desktop.
How do I stop my laptop from syncing?
Turn On or Off Sync Settings in Windows 10
- Open Settings.
- Go to the Accounts > Sync your settings page.
- On the right, go to the section Individual sync settings.
- There, turn off each option you want to exclude from sync. Enable the options you need to sync.
- Disabling the option Sync Settings will stop Windows 10 from syncing all your preferences at once.
How do I reset my default Windows 10 theme?
To return to the default colors and sounds, right-click the Start button and choose Control Panel. In the Appearance and Personalization section, choose Change the Theme. Then choose Windows from the Windows Default Themes section.
Where are Windows 10 themes stored?
Here are two important locations where Windows 10 stores your themes: Default themes – C:\Windows\Resources\Themes. Manually installed themes – %LocalAppData%\Microsoft\Windows\Themes.
How do I edit themes in Windows 10?
How to Make Your Own Windows 10 Theme
- Open the Start menu and select Settings.
- Choose Personalization from the settings screen.
- Click Themes in the Personalization window, then Theme settings.
- Give your theme a name in the window dialog box and hit OK.
Should I turn off Sync?
Turning off auto syncing for Google's services will save some battery life. In the background, Google's services talk and sync up to the cloud. You can go into the settings menu and enter Google accounts to disable auto syncing. ... This will also save some battery life.
How do I remove sync from my computer?
Turn off sync
- On your computer, open Chrome.
- At the top right, click Profile. Sync is on.
- Click Turn off.
How do I unlink my Microsoft account from my laptop?
To remove a Microsoft account from your Windows 10 PC:
- Click the Start button, and then click Settings.
- Click Accounts, scroll down, and then click the Microsoft account you would like to delete.
- Click Remove, and then click Yes.