- How do you send GIFs on messenger on iPhone?
- How do I enable GIFs on my iPhone?
- How do you post a GIF on messenger?
- Is there a GIF keyboard for iPhone?
How do you send GIFs on messenger on iPhone?
Here's how:
- Open Messages, tap , and enter a contact or tap an existing conversation.
- Tap .
- To search for a specific GIF, tap Find images, then enter a keyword, like birthday.
- Tap the GIF to add it to your message.
- Tap to send.
How do I enable GIFs on my iPhone?
How to get the iMessage GIF keyboard
- Open Messages and compose a new message or open an existing one.
- Tap the 'A' (Apps) icon to the left of the text field.
- If #images don't pop up first, tap the icon with four bubbles in the bottom left corner.
- Tap on #images to browse, search and choose a GIF.
How do you post a GIF on messenger?
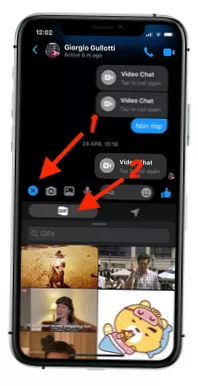
There is an option to add an animated GIF through Messenger by tapping on the + button and scrolling over to the “GIFs” button on the top menu. From there, you can select from trending GIFs or search for a GIF in the search box as you scroll horizontally. Then tap on the GIF that you want to send.
Is there a GIF keyboard for iPhone?
A GIF keyboard is automatically built into any iPhone running iOS 10 or later, allowing you to send pictures to convey thoughts or ideas. For an even greater library of GIFs, users can download third-party apps like GIF keyboard and GIPHY.