Fix Your folder can not be shared error in Windows 10
- Disable your antivirus temporarily. Sometime antivirus blocks local network sharing. ...
- Check your Internet connectivity on both of the computers.
- Restart your computers and attempt the sharing for one more time.
- If you have virtual machine installed on your PC, just disable Virtual Machine network adaptor .
- Why can't I share a folder in Windows 10?
- How do I fix a shared folder in Windows 10?
- Why is my shared folder not working?
- How do I enable file sharing in Windows 10?
- How do I connect to a shared folder in Windows 10?
- How do I access a shared folder from another computer?
- How do I get permission to access a network computer?
- How do I fix windows unable to access?
- Can see network drive but Cannot connect?
- Can't access NAS drive Windows 10?
Why can't I share a folder in Windows 10?
Go to Sharing tab and click on “Advanced Sharing “ option. Tick the box with “Share this folder”. Next, select Permissions and select the Allow box for “Full Control“ to set Full Control permission for everyone that lets you share the folder with everyone.
How do I fix a shared folder in Windows 10?
2. How do I fix Network Sharing Not Working?
- Enable and Use File Sharing Properly.
- Turn Password Protection Off.
- Add a Windows Credential.
- Disable IPv6.
- Change File Sharing Connections.
- Disable Antivirus on Your PC.
- Enable the SMB 1.0/CIFS File Sharing Support.
- Update Windows to the Latest Version.
Why is my shared folder not working?
Make sure your computers are using the same network. Make sure IPv6 is enabled on all computers. Make sure Network discovery is enabled on all computers. Make sure File and printer sharing is enabled on all computers.
How do I enable file sharing in Windows 10?
Turn on network discovery and file and printer sharing, and turn off password protected sharing.
- Select the Start button, then select Settings > Network & Internet , and on the right side, select Sharing options.
- Under Private, select Turn on Network discovery and Turn on file and printer sharing.
How do I connect to a shared folder in Windows 10?
To access a shared folder on Windows 10, use these steps:
- Open File Explorer.
- Right-click and paste the network path for the shared folder in the address bar and press Enter. Source: Windows Central.
- Confirm your account credentials (if applicable).
- Upload, download, or modify files as necessary.
How do I access a shared folder from another computer?
Right click on the Computer icon on the desktop. From the drop down list, choose Map Network Drive. Pick a drive letter that you want to use to access the shared folder and then type in the UNC path to the folder. UNC path is just a special format for pointing to a folder on another computer.
How do I get permission to access a network computer?
Setting Permissions
- Access the Properties dialog box.
- Select the Security tab. ...
- Click Edit.
- In the Group or user name section, select the user(s) you wish to set permissions for.
- In the Permissions section, use the checkboxes to select the appropriate permission level.
- Click Apply.
- Click Okay.
How do I fix windows unable to access?
Resolution
- Right-click the file or folder, and then select Properties.
- Select the Security tab.
- Under Group or User names, click your name to see the permissions you have. ...
- Select Edit, and then select to check the check boxes for the permissions that you need, and then select OK.
Can see network drive but Cannot connect?
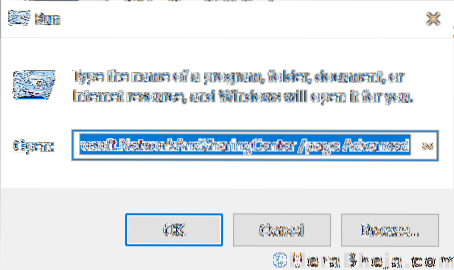
This is often the result of having the wrong settings in the Network and Sharing Center on your computer. To resolve the issue, go to Control Panel > Network and Internet > Network and Sharing Center > Advanced Sharing Settings.
Can't access NAS drive Windows 10?
Navigate to Windows File Explorer >> This PC. Right-click This PC and choose Map Network Drive.
...
Some Workarounds to Fix NAS drive not showing on network windows 10
- If you're logged in to your Windows 10 system from Microsoft Account, log out of it and log in as a local user.
- Try using Wi-Fi to access the NAS device.
![Delete Key Not Working On MacBook [Windows On Mac]](https://naneedigital.com/storage/img/images_1/delete_key_not_working_on_macbook_windows_on_mac.png)