Change Microsoft Office default save location via application settings.
- Open the Office application where you want to change the default save location and click on Options.
- Switch to the Save tab. ...
- Once you have chosen your new default save location, click the OK button to save your changes.
- How do I change the default save location?
- How do I change the default attachment save location in Outlook?
- How do I change the default save location in Word 2019?
- How do I change the default save location in Excel?
- How do I change the default scan location in Windows 10?
- How do I change the default file location in Windows 10?
- Can't change Outlook data file location?
How do I change the default save location?
To get change your default hard drive, click Start and then choose Settings (or press Windows+I). In the Settings window, click System. In the System window, choose the Storage tab on the left and then scroll down to the “Save locations” section on the right.
How do I change the default attachment save location in Outlook?
On the Edit menu, point to New, and then select String Value. Type DefaultPath, and then press Enter. Double-click the DefaultPath value. In the Edit String dialog box, type the path, including the drive letter, to the folder that you want to use for your Outlook saved items in the Value data box, and then select OK.
How do I change the default save location in Word 2019?
How to change Microsoft Office default save locations
- Click on the Office icon on the upper right of the window.
- Click on Word Options (or Excel Options, Powerpoint Options, etc.) ...
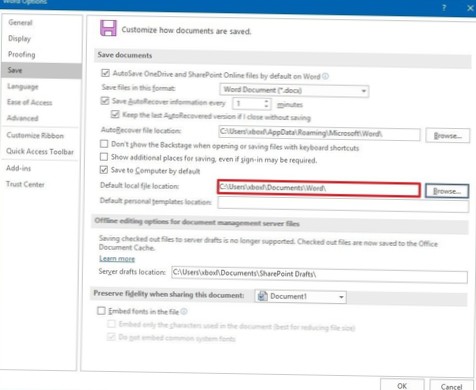
- Navigate to the "Save" tab under Word Options.
- Cick "Browse" next to Default file location, and navigate to the desired directory for saving files.
How do I change the default save location in Excel?
First, click File in the upper left corner. Next, click Options on the list page. When”Excel Options” window appears, choose the option “Save“. Go to Save workbooks section, you can modify a new location in the box of Default local file location.
How do I change the default scan location in Windows 10?
In Windows 10, just right-click on the Documents folder in File Explorer and select Move. Move it to the desired location by moving or without moving existing files. Fax & Scanner will now scan to the new location.
How do I change the default file location in Windows 10?
Windows 10
- Click the [Windows] button > choose "File Explorer."
- From the left side panel, right-click "Documents" > choose "Properties."
- Under the "Location" tab > type "H:\Docs"
- Click [Apply] > Click [No] when prompted to automatically move all files to the new location > Click [OK].
Can't change Outlook data file location?
Right-click Outlook, select New, and then select Expandable String Value. Type ForceOSTPath, and then press Enter. Right-click ForceOSTPath, and then select Modify. In the Value data box, type the full path of where you want to store the .