How to Disable Snap Assist in Windows 10
- Snapping windows is a great feature. ...
- In the Settings window, click the “System” category.
- Advertisement. ...
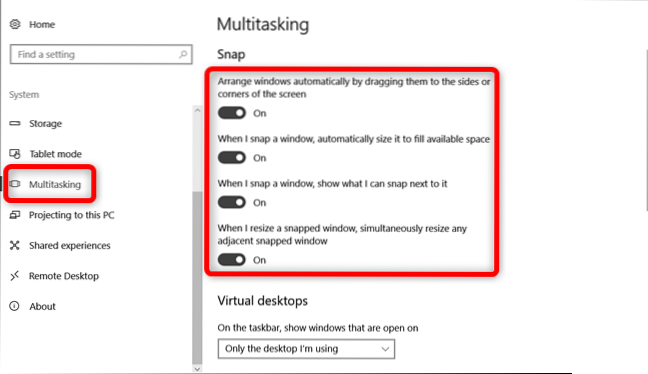
- If you only want to disable Snap Assist, turn off the “When I snap a window, show what I can snap next to it” option.
- That's all there is to it.
- What is Windows 10 snap assist?
- Where is snap assist on Windows 10?
- When I snap a window automatically size it to fill available space?
- How do I enable snapping on Windows?
- How do I snap on Windows 10?
- How do you snap windows in dual monitors?
- How do I tile on Windows 10?
- How do I tile vertically in Windows 10?
- How do I move my screen in Windows 10?
What is Windows 10 snap assist?
On Windows 10, Snap assist helps you organize the space on your screen more efficiently, improving productivity. Using this feature, you can quickly snap windows to the sides or corners perfectly using the mouse, keyboard, and touch without the need to resize and position them manually.
Where is snap assist on Windows 10?
To snap a desktop window, left-click its window title bar, hold your mouse down, and then drag it to either the left or right edges of your screen. You'll see a transparent overlay appear, showing you where the window will be placed. Release your mouse button to snap the window there.
When I snap a window automatically size it to fill available space?
When enabled, snapped windows will automatically use the available screen space to its fullest which means that they may occupy more space than a half or a quarter of the screen when enabled.
How do I enable snapping on Windows?
Here's how to find the Snap Assist settings, and how to customize them to your liking.
- Right click the Start menu and choose Settings.
- Click System.
- In the sidebar at the left of the screen, choose Multitasking.
- At the top of the screen, you'll see a list of four options for Windows Snap Assist customization.
How do I snap on Windows 10?
Snap with a keyboard
Select the window you want to snap and press the Windows Logo Key + Left Arrow or the Windows Logo Key + Right Arrow to snap the window to the side of the screen where you want it to be. You can also move it to a corner after snapping it.
How do you snap windows in dual monitors?
6 Answers
- Windows Key + ← This will snap the current window to the left side of the screen, or unsnap a window that is snapped to the right side of the screen.
- Windows Key + → This will snap the current window to the right side of the screen, or unsnap a window that is snapped to the left side of the screen.
How do I tile on Windows 10?
Using the mouse:
- Drag each window to the corner of the screen where you want it.
- Push the window's corner against the screen corner until you see an outline.
- Select the window you wish to move.
- Hit Windows Key + Left or Right. ...
- Hit Windows Key + Up or Down to make it snap to either the upper or lower corner.
How do I tile vertically in Windows 10?
With the first window open, press and hold Ctrl, then right-click the second window's button in the taskbar and choose Tile Horizontally or Tile Vertically in the pop-up that appears.
How do I move my screen in Windows 10?
Select Start > Settings > System > Display, and choose a screen orientation from the drop-down list labelled Orientation.