When you right click or press and hold on a file, folder, or drive and click/tap on Take Ownership, you will be prompted by UAC for permission to do so first. If a user is signed in as an administrator, then the user would just click/tap on Yes to approve and take ownership.
- How do I add take ownership to the right click menu?
- How do I add ownership to the context menu in Windows 10?
- How do I take ownership of files and folders?
- How do I remove take ownership?
- How do I take ownership?
- How do I take ownership of a registry key?
- How do I take ownership of a folder in Windows 10?
- How do geeks take ownership?
- What does it mean to take ownership?
- How do I change ownership of a shared folder?
- How do I take ownership of a folder in CMD?
- How do I change ownership of a file?
How do I add take ownership to the right click menu?
Once you completed the steps, you can simply right-click any file or folder, and you should now see a new "Take Ownership" item on the menu. Then simply, right-click the file or folder, right-click it and select Take Ownership.
How do I add ownership to the context menu in Windows 10?
Add Take ownership to file/folder context menu in Windows 10
- Step 1: Click here to download Take Ownership. ...
- Step 2: Right-click on Install Take Ownership. ...
- Step 3: Click the Run button if you see the following file security warning.
How do I take ownership of files and folders?
How to Take Ownership of Files and Folders in Windows
- Right-click the object and choose “Properties.”
- In the Properties window, on the “Security” tab, click “Advanced.”
- Next to the listed Owner, click the “Change” link.
- Type your user account name into the “Enter the object name to select” box and then click “Check Names.”
- When the name is validated, click “OK.”
How do I remove take ownership?
If you have used the Ownership application to add the Take Ownership to the right-click menu, you can remove this entry using the same program. Run the Ownership.exe file, click Yes in the UAC prompt and then click Uninstall. Without any further confirmation, the entry is removed.
How do I take ownership?
If you're ready to make that change, here's how to start building personal ownership:
- Notice Your Blaming Tendencies. Our tendency to blame others for our circumstances is often a knee-jerk reaction. ...
- Focus on Solutions. ...
- Practice Your Power of Choice. ...
- Become Accountable. ...
- Try Discomfort. ...
- Monitor Your Media.
How do I take ownership of a registry key?
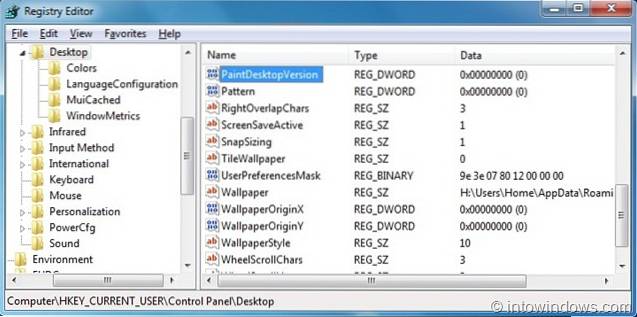
Take Ownership of a Registry Key
- Open the Registry Editor by running regedit.exe.
- Navigate to the branch for which you want to modify the permissions.
- Right-click on the branch, and choose Permissions…
- Click the Advanced button.
- In the Advanced Security Settings dialog, note down the owner. ...
- Type your user account name and click OK.
How do I take ownership of a folder in Windows 10?
How to Take Ownership of a Folder in Windows 10 Using File Explorer
- Right-click on a file or folder.
- Select Properties.
- Click the Security tab.
- Click Advanced.
- Click "Change" next to the owner name.
- Click Advanced.
- Click Find Now.
- Select your username and click OK.
How do geeks take ownership?
In the properties window, type “Take Ownership” into the “Value data” box and then click “OK.” The value you type here will become the command you see on your context menu, so feel free to change this to whatever you want. Next, you're going to create a new value inside the runas key.
What does it mean to take ownership?
Taking ownership means standing up and announcing that you are responsible for executing a particular task or project. Sometimes taking ownership will just mean being accountable for a project within your job description. ... Taking ownership also means making an active and enthusiastic commitment.
How do I change ownership of a shared folder?
How to change owners
- Open the homescreen for Google Drive, Google Docs, Google Sheets, or Google Slides.
- Click the file you want to transfer to someone else.
- Click Share or Share .
- To the right of a person you've already shared the file with, click the Down arrow .
- Click Make owner.
- Click Done.
How do I take ownership of a folder in CMD?
A: In Windows Vista, Microsoft introduced the Takeown.exe command-line tool, which can be used to take ownership of a file or folder. You need to run this tool from an elevated command prompt window. (Click Start, open the Accessories folder, right-click Command Prompt, and click Run as administrator.)
How do I change ownership of a file?
How to Change the Owner of a File
- Become superuser or assume an equivalent role.
- Change the owner of a file by using the chown command. # chown new-owner filename. new-owner. Specifies the user name or UID of the new owner of the file or directory. filename. Specifies the file or directory.
- Verify that the owner of the file has changed. # ls -l filename.