Pin folders to Quick Access
- Open File Explorer.
- Navigate to the folder that you want to pin to Quick Access.
- Select that folder by clicking on it.
- Click the Home tab on the Ribbon. The Home tab is shown.
- In the Clipboard section, click the Pin to Quick Access button. The selected folder is now listed in Quick Access.
- Why can't I pin a file to quick access?
- How many folders can you pin to quick access?
- How do I organize quick access in Windows 10?
- Can you pin a file to quick access?
- How do I reset the Quick Access toolbar in Windows 10?
- What is the Quick Access toolbar in Windows 10?
- How do I stop folders from appearing in quick access?
- Why do my quick access folders disappeared?
- Where is quick access toolbar stored?
- What is Quick Access Toolbar?
- How do I get my quick access toolbar back?
Why can't I pin a file to quick access?
In File Explorer, try to remove the pinned item by right-clicking and choosing Unpin from Quick access or use Remove from Quick access (for frequent places that's added automatically). But if that doesn't work, create a folder with the same name and in the same location where the pinned item expects the folder to be.
How many folders can you pin to quick access?
With Quick Access, you can see up to 10 frequently used folders, or the 20 most recently accessed files, in the File Explorer window.
How do I organize quick access in Windows 10?
How To: Organize the Windows 10 Quick Folders on Start
- Go into the Windows 10 Settings app and choose the Personalization option.
- Tap or Click on the Start option in the menu and then select "Choose which folders appear on Start."
- Modify what you want to appear when you tap or click the Start button.
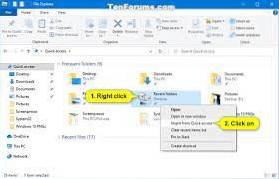
Can you pin a file to quick access?
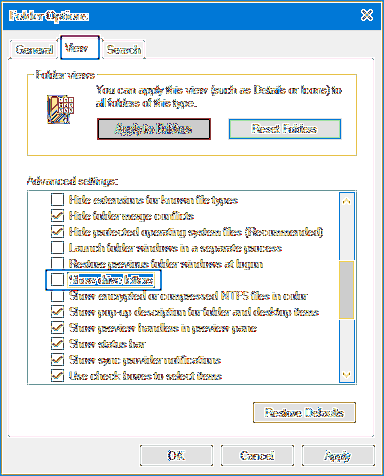
Just right-click it and select Pin to Quick access. Unpin it when you don't need it there anymore. If you want to see only your pinned folders, you can turn off recent files or frequent folders. Go to the View tab, and then select Options.
How do I reset the Quick Access toolbar in Windows 10?
Reset Quick Access Toolbar in Windows 10 File Explorer
- Open the Registry Editor app.
- Close all File Explorer windows.
- Go to the following Registry key. HKEY_CURRENT_USER\Software\Microsoft\Windows\CurrentVersion\Explorer\Ribbon. See how to go to a Registry key with one click.
- On the right, delete the string value called QatItems.
What is the Quick Access toolbar in Windows 10?
The Quick Access Toolbar is a small, customizable toolbar that exposes a set of commands that are specified by the application or selected by the user. It provides a lot of customization opportunities to help make the commands and actions you use most often in File Explorer quicker and easier to use.
How do I stop folders from appearing in quick access?
To prevent folders from appearing in the Quick Access section, go to View - Options in any File Explorer window and uncheck the box that says "Show recently accessed folders in Quick access".
Why do my quick access folders disappeared?
In the Privacy section, uncheck the boxes and select Apply. Now, Quick Access will only show anchored folders. (If you turn them on again, the items you previously removed from Quick Access might reappear.) If you prefer File Explorer to open on This computer, go to the View tab and then select Options.
Where is quick access toolbar stored?
All Outlook ribbon and quick access toolbar settings are stored in Office UI files automatically. In other words, to backup the files just means archiving the settings. You can open your Windows Explorer and copy the following directory to the address bar – “C:\Users\%username%\AppData\Local\Microsoft\Office”.
What is Quick Access Toolbar?
The Quick Access Toolbar is located to the right of the Microsoft Office. Button . It contains commands that are used most often, for example Redo, Undo and Save. Word 2007 allows you to customize the Quick Access Toolbar, meaning that you can add and remove commands as you like.
How do I get my quick access toolbar back?
If you customize the Quick Access toolbar, you can restore it to the original settings.
- Open the Customize dialog box using one of these methods: ...
- In the Customize dialog box, click the Quick Access tab.
- On the Quick Access page, click Reset. ...
- In the message dialog box, click Yes.
- In the Customize dialog box, click Close.