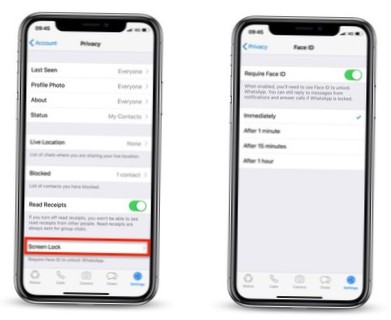
How to Lock WhatsApp on iPhone With Face ID or Touch ID
- Launch WhatsApp on your iPhone.
- If you're viewing a chat thread, back out of it, then tap Settings in the bottom-right corner of the screen.
- Tap Account.
- Tap Privacy.
- Tap Screen Lock.
- Toggle on Require Face ID / Require Touch ID.
- Select a time delay if desired, or allow it to lock Immediately.
- Can I lock my WhatsApp on iPhone?
- Can I lock my we chat app with Face ID in iOS?
- How can I lock WhatsApp with Face ID?
- Can I put a lock on my WhatsApp?
- How can I remove Touch ID from WhatsApp?
- How can I lock my WhatsApp on iPhone without face ID?
- How do I lock WhatsApp on iPhone 12?
- How do I remove Face ID from iPhone?
Can I lock my WhatsApp on iPhone?
WhatsApp just got a neat new security feature on iOS. With version 2.19. 20, iPhone and iPad users can now lock the app using their devices' biometric locks—Touch ID or Face ID, depending on your device's capabilities. ... In WhatsApp, click on the “Settings” tab and go into the “Privacy” menu.
Can I lock my we chat app with Face ID in iOS?
Facebook's Messenger app supports Apple's Face ID face recognition tech, as well as Touch ID fingerprint scanner. ... With version 274.1, iPhone and iPad users can now lock the device using Face ID or Touch ID, depending on the device's capabilities.
How can I lock WhatsApp with Face ID?
The steps below describe how to enable this with Face ID; if you have Touch ID on your phone, the procedure is the same.
...
For Android
- Open WhatsApp.
- Go to Settings>Account>Privacy>Fingerprint lock.
- Turn on Unlock with Fingerprint toggle.
Can I put a lock on my WhatsApp?
First, go to WhatsApp "settings" on your Android smartphone. Then head to the "account" section and tap on "privacy". ... You then tap on the “fingerprint lock”, following which you will be asked to confirm whether you want to use your fingerprint sensor to lock/unlock WhatsApp with your registered finger on the sensor.
How can I remove Touch ID from WhatsApp?
How to disable fingerprint lock on WhatsApp
- Open WhatsApp on your phone.
- Tap the overflow button (three dots) at the top right corner.
- Now, click on 'Settings'.
- From settings, tap on Account > Privacy > Fingerprint lock.
- Now, disable the toggle for 'Unlock with fingerprint'.
How can I lock my WhatsApp on iPhone without face ID?
How to bypass Face ID or Touch ID on locked WhatsApp
- Open Settings on your iPhone.
- Scroll down to 'Face ID & Passcode' or 'Touch ID & Passcode'
- Enter the iPhone's passcode.
- Tap on 'Other Apps' under the 'Use Face ID/Touch ID For' section.
- Toggle off WhatsApp.
- Re-open WhatsApp.
- Enter the iPhone's passcode.
How do I lock WhatsApp on iPhone 12?
How to Lock WhatsApp on iPhone With Face ID or Touch ID
- Launch WhatsApp on your iPhone.
- If you're viewing a chat thread, back out of it, then tap Settings in the bottom-right corner of the screen.
- Tap Account.
- Tap Privacy.
- Tap Screen Lock.
- Toggle on Require Face ID / Require Touch ID.
- Select a time delay if desired, or allow it to lock Immediately.
How do I remove Face ID from iPhone?
Turn off Face ID
Go to Settings > Face ID & Passcode. Do one of the following: Turn off Face ID for specific items only: Turn off one or more options: iPhone Unlock, Apple Pay, iTunes & App Store, or Safari AutoFill. Turn off Face ID: Tap Reset Face ID.

![Delete Key Not Working On MacBook [Windows On Mac]](https://naneedigital.com/storage/img/images_1/delete_key_not_working_on_macbook_windows_on_mac.png)