To do this, all you have to do is to type a word or phrase to be auto-formatted. Once done, format it the way you like it: bold, italic, smaller or bigger font size, different font face, different color, or whatever you want. Then, select the text and press the keyboard shortcut: Alt+T.
- How do I auto format a Word document?
- How do you auto italicize words automatically?
- How do you use AutoText?
- Which option is used in MS Word for auto format customization?
- Where is format option in Word?
- How do you remove auto format in Word?
How do I auto format a Word document?
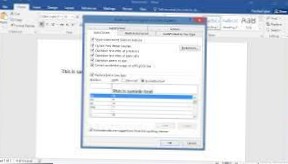
Click the "File" tab and click "Options" to bring up Word Options dialog. From the left sidebar click the "Proofing" and then click the "AutoCorrect Options". The AutoCorrect window will appear, from which AutoFormat options can be visible clearly at the left top.
How do you auto italicize words automatically?
3 Answers
- Type in situ anywhere on your document.
- Highlight it then press Ctrl + I to italicize it.
- With the italic text selected, open the Autocorrect Options window ( Alt + T then A ).
- Under the AutoCorrect tab, select Formatted text. Type "in situ" under Replace. ( ...
- Click Add then OK. Note: Don't forget to click Add.
How do you use AutoText?
To use the text, go to Insert > Quick Parts, > AutoText, and choose the entry you want.
...
Create and use an AutoText entry
- In your document, select the text that you want to make into a reusable snippet.
- Press Alt+F3.
- Fill out the information in the Create New Building Block dialog box.
Which option is used in MS Word for auto format customization?
Click “Options…” to access these settings. The “AutoFormat” tab on the “AutoCorrect” dialog box displays. Select the items you want Word to format automatically. Click “OK.”
Where is format option in Word?
Open one word document, in the group of the "Menus" tab at the far left of the Ribbon of word 2007/2010/2013, you can view the "Format" menu and execute many commands from the drop-down menu of Format.
How do you remove auto format in Word?
Follow these steps:
- Display the Word Options dialog box. ...
- Click Proofing at the left of the dialog box.
- Click the AutoCorrect Options button. ...
- Make sure the AutoFormat As You Type tab is displayed. ...
- Clear the Border Lines check box.
- Click OK to dismiss the AutoCorrect dialog box.