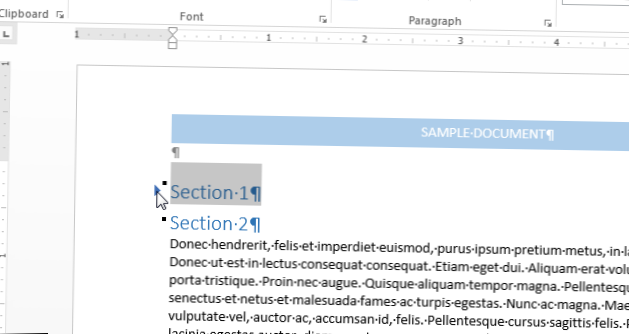
To do this, right-click on any heading and move your mouse over “Expand/Collapse” on the popup menu. Then, select “Collapse All Headings” from the submenu to collapse all the headings in your document, or “Expand All Headings” to expand all the headings again.
- How do you collapse and expand parts of a Word document?
- How do you expand a Word document on a Mac?
- How do you create subsections in Word?
- What is the little arrow in my Word document?
- Can you collapse sections in Word?
- How do I make my Word document bigger on screen?
- How do I make collapsible headings in Word for Mac?
- What is the size of a Word document page in pixels?
- How do I make headings in Word?
- How do I automatically number headings in Word?
- How do I make a multilevel list in Word?
How do you collapse and expand parts of a Word document?
Click the triangle again to expand that part of the document. To collapse or expand all the headings in your document, right-click the heading and click Expand/Collapse > Expand All Headings or Collapse All Headings. When you close and reopen a document, the headings will be expanded by default.
How do you expand a Word document on a Mac?
click : clicking the green zoom button defaults to switching your application to full screen. option + click : as mentioned by @nullmeta already, you can option + click to cause the height of the window to go to full height. option + shift + click : will maximize both the window's height and width.
How do you create subsections in Word?
Follow these steps to create a new subhead within a chapter:
- Type in the text for the subheading.
- Click the style that appears in the Style Area left of the subheading.
- In the Styles Toolbox, click the style you want to apply. Use “Heading 2” for a first-level subheading, “Heading 3” for a second-level subheading, etc.
What is the little arrow in my Word document?
What is the Arrow Left symbol in Microsoft Word means? This is the symbol that tells you that you have pressed the 'Tab' in your keyboard. Every time you press 'tab' it will show you this. It happens because the 'Tab characters' has selected.
Can you collapse sections in Word?
Collapse or expand parts of a document
Place your cursor in the heading. On the HOME tab, in the Paragraph group, click the dialog box launcher. In the Paragraph dialog box, click the checkbox next to Collapsed by default. Click OK.
How do I make my Word document bigger on screen?
Windows - Making text larger in Microsoft Word
- Below are the step-by-step instructions on how to increase the text size in Word. ...
- Click the ' View ' menu or press ' Alt' + 'V '.
- Click on ' Zoom ' or press ' Z ' to display the zoom box. ...
- Fig 1.
- Either click on the zoom level you want, or use the up and down arrows to select a value.
How do I make collapsible headings in Word for Mac?
To do this, right-click on any heading and move your mouse over “Expand/Collapse” on the popup menu. Then, select “Collapse All Headings” from the submenu to collapse all the headings in your document, or “Expand All Headings” to expand all the headings again.
What is the size of a Word document page in pixels?
Using 2480 x 3508 pixels would give you the equivalent to an A4 sheet at 300 dots-per-inch.
How do I make headings in Word?
To add a heading style
- Type the text you want into a Word document.
- Select a sentence that you want to add a header to.
- Select Home > Styles (or press Alt+H, then L), and then select the heading you want, such as the Heading 1 button.
How do I automatically number headings in Word?
Number your headings
- Open your document that uses built-in heading styles, and select the first Heading 1.
- On the Home tab, in the Paragraph group, choose Multilevel List.
- Under List Library, choose the numbering style you would like to use in your document.
How do I make a multilevel list in Word?
To Create a List with Multiple Levels:
- Place your cursor anywhere within your list.
- Under the "Home" tab, locate the "Paragraph" group > Click the [Multilevel List] icon located next to the [Numbering] icon.
- Choose a list from the “List Library,” or click “Define New Multilevel List” and complete the following: